https://google.github.io/mediapipe/getting_started/python.html
MediaPipe in Python
Cross-platform, customizable ML solutions for live and streaming media.
google.github.io
1. 파이선 기본 툴 설치하기
$ sudo apt install python3-dev
$ sudo apt install python3-venv
$ sudo apt install -y protobuf-compiler
2. 가상환경 구성하기
- 폴더명은 마음대로 정할 수 있다. 여기서는 mp_env로 설정하였다.
$ python3 -m venv mp_env && source mp_env/bin/activate
3. 가상환경에서 파이선 패키지를 설치한다.
(mp_env)mediapipe$ pip3 install -r requirements.txt
4. 가상환경에서 protocol buffer와 opencv 패키지를 설치한다.
(mp_env)mediapipe$ python3 setup.py gen_protos
(mp_env)mediapipe$ python3 setup.py install --link-opencv
5. 파이썬 예제코드 작성(mp_hands.py)
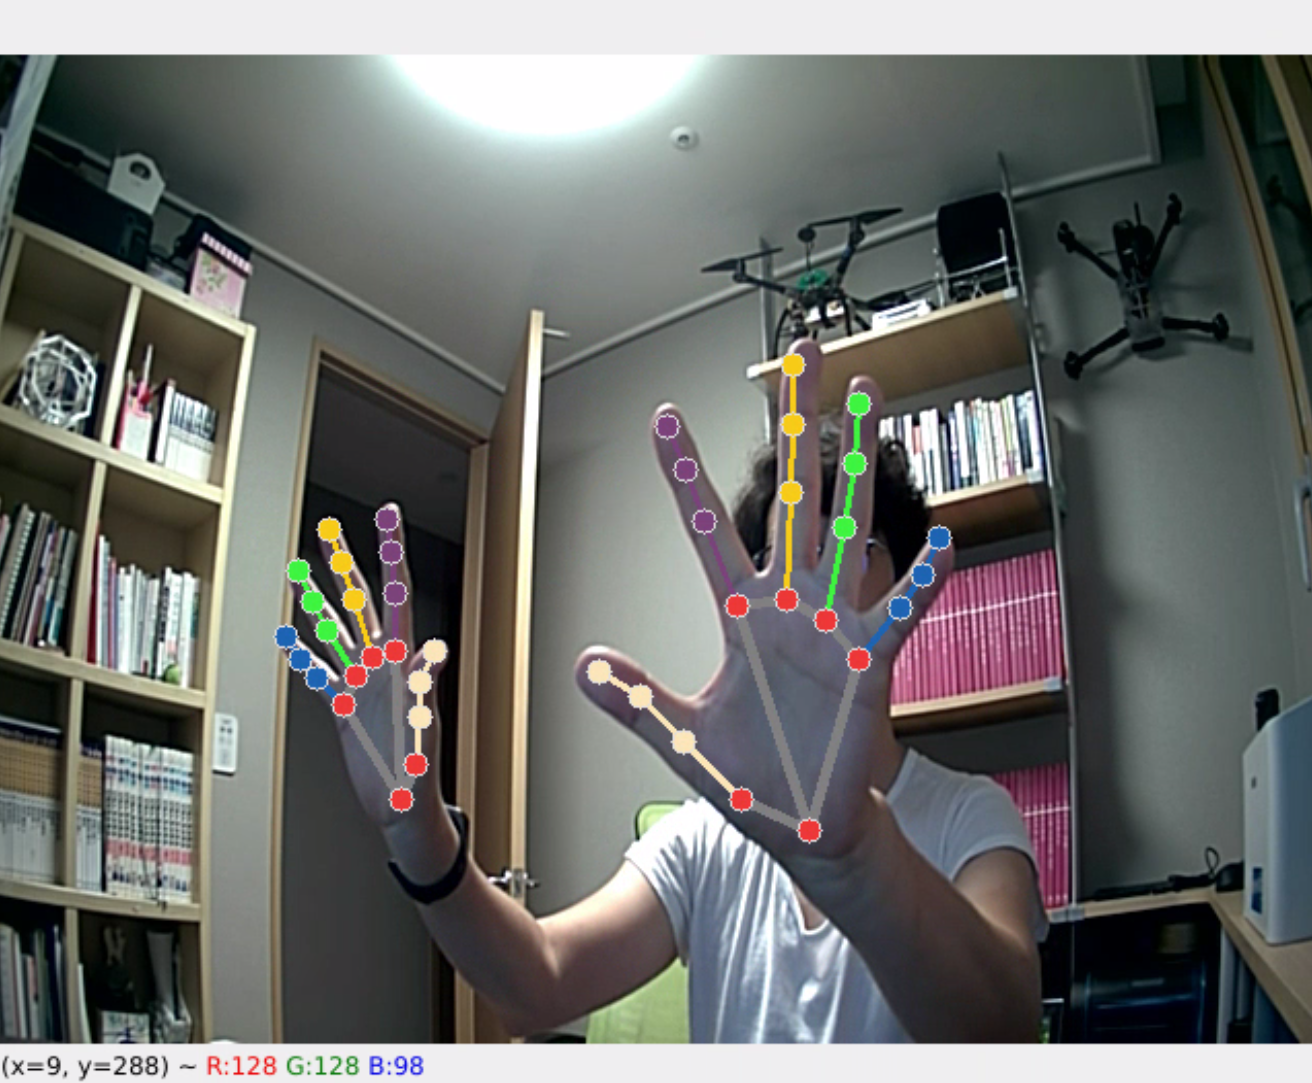
- 예제는 손가락 마디를 인식하고 추적하는 예제이다.

import cv2
import mediapipe as mp
mp_drawing = mp.solutions.drawing_utils
mp_drawing_styles = mp.solutions.drawing_styles
mp_hands = mp.solutions.hands

# For static images:
IMAGE_FILES = []
with mp_hands.Hands(
    static_image_mode=True,
    max_num_hands=2,
    min_detection_confidence=0.5) as hands:
  for idx, file in enumerate(IMAGE_FILES):
    # Read an image, flip it around y-axis for correct handedness output (see
    # above).
    image = cv2.flip(cv2.imread(file), 1)
    # Convert the BGR image to RGB before processing.
    results = hands.process(cv2.cvtColor(image, cv2.COLOR_BGR2RGB))

    # Print handedness and draw hand landmarks on the image.
    print('Handedness:', results.multi_handedness)
    if not results.multi_hand_landmarks:
      continue
    image_height, image_width, _ = image.shape
    annotated_image = image.copy()
    for hand_landmarks in results.multi_hand_landmarks:
      print('hand_landmarks:', hand_landmarks)
      print(
          f'Index finger tip coordinates: (',
          f'{hand_landmarks.landmark[mp_hands.HandLandmark.INDEX_FINGER_TIP].x * image_width}, '
          f'{hand_landmarks.landmark[mp_hands.HandLandmark.INDEX_FINGER_TIP].y * image_height})'
      )
      mp_drawing.draw_landmarks(
          annotated_image,
          hand_landmarks,
          mp_hands.HAND_CONNECTIONS,
          mp_drawing_styles.get_default_hand_landmarks_style(),
          mp_drawing_styles.get_default_hand_connections_style())
    cv2.imwrite(
        '/tmp/annotated_image' + str(idx) + '.png', cv2.flip(annotated_image, 1))

# For webcam input:
cap = cv2.VideoCapture(0)
with mp_hands.Hands(
    min_detection_confidence=0.5,
    min_tracking_confidence=0.5) as hands:
  while cap.isOpened():
    success, image = cap.read()
    if not success:
      print("Ignoring empty camera frame.")
      # If loading a video, use 'break' instead of 'continue'.
      continue

    # Flip the image horizontally for a later selfie-view display, and convert
    # the BGR image to RGB.
    image = cv2.cvtColor(cv2.flip(image, 1), cv2.COLOR_BGR2RGB)
    # To improve performance, optionally mark the image as not writeable to
    # pass by reference.
    image.flags.writeable = False
    results = hands.process(image)

    # Draw the hand annotations on the image.
    image.flags.writeable = True
    image = cv2.cvtColor(image, cv2.COLOR_RGB2BGR)
    if results.multi_hand_landmarks:
      for hand_landmarks in results.multi_hand_landmarks:
        mp_drawing.draw_landmarks(
            image,
            hand_landmarks,
            mp_hands.HAND_CONNECTIONS,
            mp_drawing_styles.get_default_hand_landmarks_style(),
            mp_drawing_styles.get_default_hand_connections_style())
    cv2.imshow('MediaPipe Hands', image)
    if cv2.waitKey(5) & 0xFF == 27:
      break
cap.release()
6. Python 코드 실행
- 실행은 작성한 코드가 있는 폴더에서 실행한다.
(mp_env) swift@swift-System-Product-Name:~/workspace/ComputerVision/proj_mediapipe/python$ python3 mp_hands.py
INFO: Created TensorFlow Lite XNNPACK delegate for CPU.
7. 동일환경에서 C/C++ 코드 빌드
- 이때 경로는 mediapipe 경로에서 실행해야 한다!
(mp_env) swift@swift-System-Product-Name:~/workspace/ComputerVision/mediapipe$ bazel build -c opt --define MEDIAPIPE_DISABLE_GPU=1 mediapipe/examples/desktop/hand_tracking:hand_tracking_cpu
8. C/C++ 코드 실행 (CPU 모드)
(mp_env) swift@swift-System-Product-Name:~/workspace/ComputerVision/mediapipe$ GLOG_logtostderr=1 bazel-bin/mediapipe/examples/desktop/hand_tracking/hand_tracking_cpu \
>   --calculator_graph_config_file=mediapipe/graphs/hand_tracking/hand_tracking_desktop_live.pbtxt
I20210903 23:51:52.009392 89177 demo_run_graph_main.cc:48] Get calculator graph config contents: # MediaPipe graph that performs hands tracking on desktop with TensorFlow
# Lite on CPU.
# Used in the example in
# mediapipe/examples/desktop/hand_tracking:hand_tracking_cpu.

# CPU image. (ImageFrame)
input_stream: "input_video"

# CPU image. (ImageFrame)
output_stream: "output_video"

# Generates side packet cotaining max number of hands to detect/track.
node {
  calculator: "ConstantSidePacketCalculator"
  output_side_packet: "PACKET:num_hands"
  node_options: {
    [type.googleapis.com/mediapipe.ConstantSidePacketCalculatorOptions]: {
      packet { int_value: 2 }
    }
  }
}

# Detects/tracks hand landmarks.
node {
  calculator: "HandLandmarkTrackingCpu"
  input_stream: "IMAGE:input_video"
  input_side_packet: "NUM_HANDS:num_hands"
  output_stream: "LANDMARKS:landmarks"
  output_stream: "HANDEDNESS:handedness"
  output_stream: "PALM_DETECTIONS:multi_palm_detections"
  output_stream: "HAND_ROIS_FROM_LANDMARKS:multi_hand_rects"
  output_stream: "HAND_ROIS_FROM_PALM_DETECTIONS:multi_palm_rects"
}

# Subgraph that renders annotations and overlays them on top of the input
# images (see hand_renderer_cpu.pbtxt).
node {
  calculator: "HandRendererSubgraph"
  input_stream: "IMAGE:input_video"
  input_stream: "DETECTIONS:multi_palm_detections"
  input_stream: "LANDMARKS:landmarks"
  input_stream: "HANDEDNESS:handedness"
  input_stream: "NORM_RECTS:0:multi_palm_rects"
  input_stream: "NORM_RECTS:1:multi_hand_rects"
  output_stream: "IMAGE:output_video"
}
I20210903 23:51:52.009897 89177 demo_run_graph_main.cc:54] Initialize the calculator graph.
I20210903 23:51:52.012053 89177 demo_run_graph_main.cc:58] Initialize the camera or load the video.
[ WARN:0] global /home/swift/workspace/opencv/opencv-4.4.0/modules/videoio/src/cap_gstreamer.cpp (935) open OpenCV | GStreamer warning: Cannot query video position: status=0, value=-1, duration=-1
I20210903 23:51:53.762176 89177 demo_run_graph_main.cc:79] Start running the calculator graph.
I20210903 23:51:53.766999 89177 demo_run_graph_main.cc:84] Start grabbing and processing frames.
INFO: Created TensorFlow Lite XNNPACK delegate for CPU.
I20210903 23:53:16.705740 89177 demo_run_graph_main.cc:143] Shutting down.
I20210903 23:53:16.713604 89177 demo_run_graph_main.cc:157] Success!
(mp_env) swift@swift-System-Product-Name:~/workspace/ComputerVision/mediapipe$
9. C/C++ 코드 실행 (GPU 모드)
(mp_env) bazel build -c opt --copt -DMESA_EGL_NO_X11_HEADERS --copt -DEGL_NO_X11 \
  mediapipe/examples/desktop/hand_tracking:hand_tracking_gpu

(mp_env) GLOG_logtostderr=1 bazel-bin/mediapipe/examples/desktop/hand_tracking/hand_tracking_gpu \
  --calculator_graph_config_file=mediapipe/graphs/hand_tracking/hand_tracking_mobile.pbtxt
'엔지니어링 > 인공지능' 카테고리의 다른 글
| [ 머신러닝 ] 모두를 위한 머신러닝 도커환경설정 (0) | 2021.12.28 |
|---|---|
| [ 머신러닝 예제 ] MacOS에 python 텐서플로우 설치환경 구축 (0) | 2021.12.17 |
| Google Mediapipe C++ 환경설정 (0) | 2021.09.02 |
| [ YOLO ] Windows 버전 설치 환경 구성하기 (1) | 2021.06.17 |
| [ OpenCV ] Ubuntu 18.04 에 CUDA11.1 + CUDNN 8.2.1 설치하기 (0) | 2021.06.13 |


댓글