SPI 통신의 기초 개념에 대해 살펴보고 SPI 통신을 이용하요 RFID를 제어해본다
1. 회로도 구성
- 아두이노 우노에는 SPI 통신용 포트가 정해져 있으므로 RFID의 SPI 인터페이스는 아래와 같이 연결한다. 단, 아두이노 보드의 3V3 전원을 사용해야 한다.
SCK : D13
MOSI : D11
MISO : D12
SDA : D10
RST : D9


2. 기초개념
1) SPI(Serial Peripheral Interface) 통신
- 클럭을 사용하여 비동기방식의 단점(Overhead, 설정 맞춤, 전송오류)을 보완함
- I2C보다 속도가 빠른 편임, 1:N 구조가 가능함
- SCK(클럭), MOSI(마스터 출력 슬레이브 입력), MISO(마스터 입력 슬레이브 출력), SS(슬레이브 선택)

2) SPI 통신 구조
- 클럭은 마스터만 생성할 수 있으며, 마스터가 보낼 때 그리고 슬레이브에서 받을 때에도 마스터가 클럭을 생성함

* 참고자료
https://learn.sparkfun.com/tutorials/serial-peripheral-interface-spi/all
learn.sparkfun.com
https://www.arduino.cc/en/Reference/SPI
Arduino - SPI
This library allows you to communicate with SPI devices, with the Arduino as the master device. To use this library #include A Brief Introduction to the Serial Peripheral Interface (SPI) Serial Peripheral Interface (SPI) is a synchronous serial data protoc
www.arduino.cc
3) RFID(Radio Frequency Identification)
- 전파를 이용하여 물건이나 사람 과 같은 대상을 식별하는 기술
- 전파를 이용하기 때문에 전파가 투과할 수 있는 물질이 있어도 정보 송수신이 가능함
- RF 태그와 리더기로 구성되어 있음
- 바코드와 비교해보면 아래와 같음
| 구분 | 바코드 | RFID |
| 인식방법 | 광학(접촉식) | 무선(비접촉식) |
| 이동인식 | 불가능 | 가능 |
| 인식시간 | 1~2/sec | 100/sec |
| 데이터량 | 수십 bytes | 수십~ 수백 kbytes |
| 판독 | 읽기 | 일기/쓰기 |
| 재사용 | 불가능 | 가능 |
| 투과성 | 불가 | 가능 |
| 보안성 | 낮음 | 높음 |
| 가격 | 저렴 | 상대적 높음 |
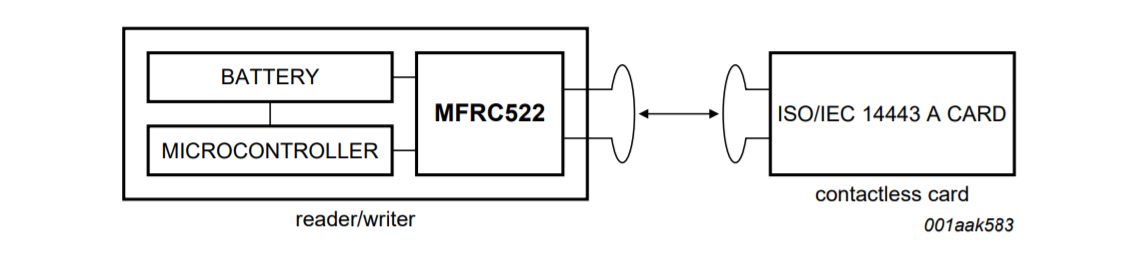
4) RFID 모듈
- RC522는 13.56MHz 주파수를 사용하는 RFID 모듈이며 읽고쓰기가 가능하고, 자체 안테나를 통하여 정보를 RFID Tag로 송수신한다.
- RFID Tag는 안테나와 마이크로칩으로 구성되어 있고 전원은 외부에서 받거나 자체전원을 가질 수 있다.
3. 소스코드
1) RFID 값 읽기
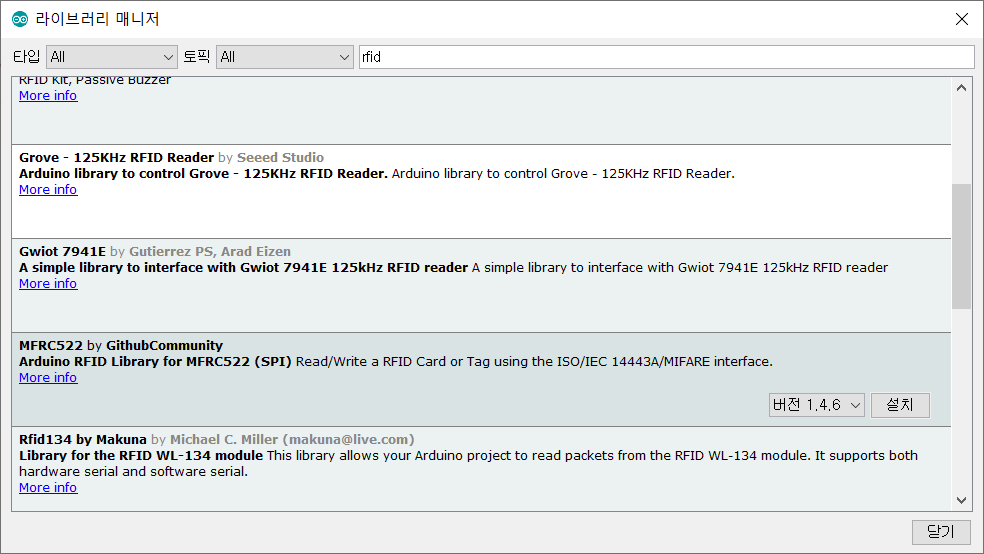
소스코드를 실행하기 전에 먼저 RC522 제품을 사용하기 위한 라이브러리를 설치해야 한다.
라이브러리 관리에서 RFID를 검색하면 'MFR522 by GithubCommunity' 라이브러리를 찾을 수 있고, 이 라이브러리를 설치한다.
소스코드는 아래와 같다. 소스는 라이브러리를 설치하면 예제에서 MFRC522에 관련된 다양한 예제들이 나타난다. 그중 ReadNUID 를 찾아서 실행하면 된다.
| /*****************************************************/ /* Project : Arduino Basic Training Course /* Title : 07_SPI_RFID /* Descript : RFID example using SPI comm /* Platform : Arduion UNO /* IDE: Arduino Sketch 1.6/1.8 or vMicro /* Author : Imported by Arduino example /* History : Rev 1.0 2020.02.11 - Initial release /* /*****************************************************/ #include <SPI.h> #include <MFRC522.h> #define SS_PIN 10 #define RST_PIN 9 MFRC522 rfid(SS_PIN, RST_PIN); // Instance of the class MFRC522::MIFARE_Key key; // Init array that will store new NUID byte nuidPICC[4]; void setup() { Serial.begin(9600); SPI.begin(); // Init SPI bus rfid.PCD_Init(); // Init MFRC522 for (byte i = 0; i < 6; i++) { key.keyByte[i] = 0xFF; } Serial.println(F("This code scan the MIFARE Classsic NUID.")); Serial.print(F("Using the following key:")); printHex(key.keyByte, MFRC522::MF_KEY_SIZE); } void loop() { // Reset the loop if no new card present on the sensor/reader. This saves the entire process when idle. if ( ! rfid.PICC_IsNewCardPresent()) return; // Verify if the NUID has been readed if ( ! rfid.PICC_ReadCardSerial()) return; Serial.print(F("PICC type: ")); MFRC522::PICC_Type piccType = rfid.PICC_GetType(rfid.uid.sak); Serial.println(rfid.PICC_GetTypeName(piccType)); // Check is the PICC of Classic MIFARE type if (piccType != MFRC522::PICC_TYPE_MIFARE_MINI && piccType != MFRC522::PICC_TYPE_MIFARE_1K && piccType != MFRC522::PICC_TYPE_MIFARE_4K) { Serial.println(F("Your tag is not of type MIFARE Classic.")); return; } if (rfid.uid.uidByte[0] != nuidPICC[0] || rfid.uid.uidByte[1] != nuidPICC[1] || rfid.uid.uidByte[2] != nuidPICC[2] || rfid.uid.uidByte[3] != nuidPICC[3] ) { Serial.println(F("A new card has been detected.")); // Store NUID into nuidPICC array for (byte i = 0; i < 4; i++) { nuidPICC[i] = rfid.uid.uidByte[i]; } Serial.println(F("The NUID tag is:")); Serial.print(F("In hex: ")); printHex(rfid.uid.uidByte, rfid.uid.size); Serial.println(); Serial.print(F("In dec: ")); printDec(rfid.uid.uidByte, rfid.uid.size); Serial.println(); } else Serial.println(F("Card read previously.")); // Halt PICC rfid.PICC_HaltA(); // Stop encryption on PCD rfid.PCD_StopCrypto1(); } /** * Helper routine to dump a byte array as hex values to Serial. */ void printHex(byte *buffer, byte bufferSize) { for (byte i = 0; i < bufferSize; i++) { Serial.print(buffer[i] < 0x10 ? " 0" : " "); Serial.print(buffer[i], HEX); } } /** * Helper routine to dump a byte array as dec values to Serial. */ void printDec(byte *buffer, byte bufferSize) { for (byte i = 0; i < bufferSize; i++) { Serial.print(buffer[i] < 0x10 ? " 0" : " "); Serial.print(buffer[i], DEC); } } |
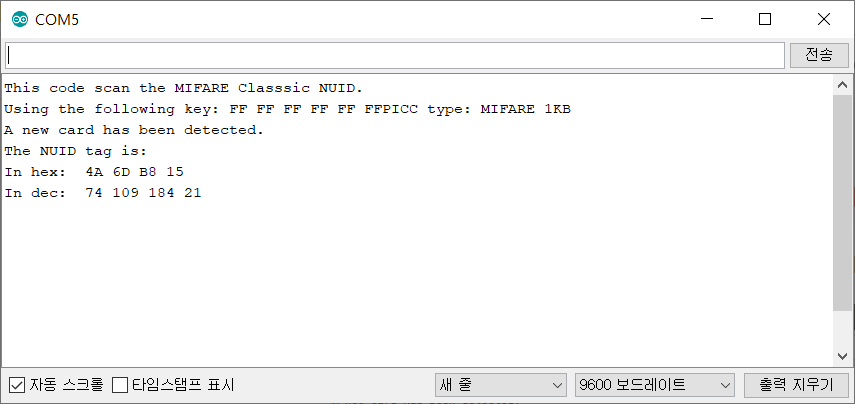
실행결과
리더기에 RFID를 가까이 대면 아래와 같이 카드를 검출하고 ID값을 읽어준다.
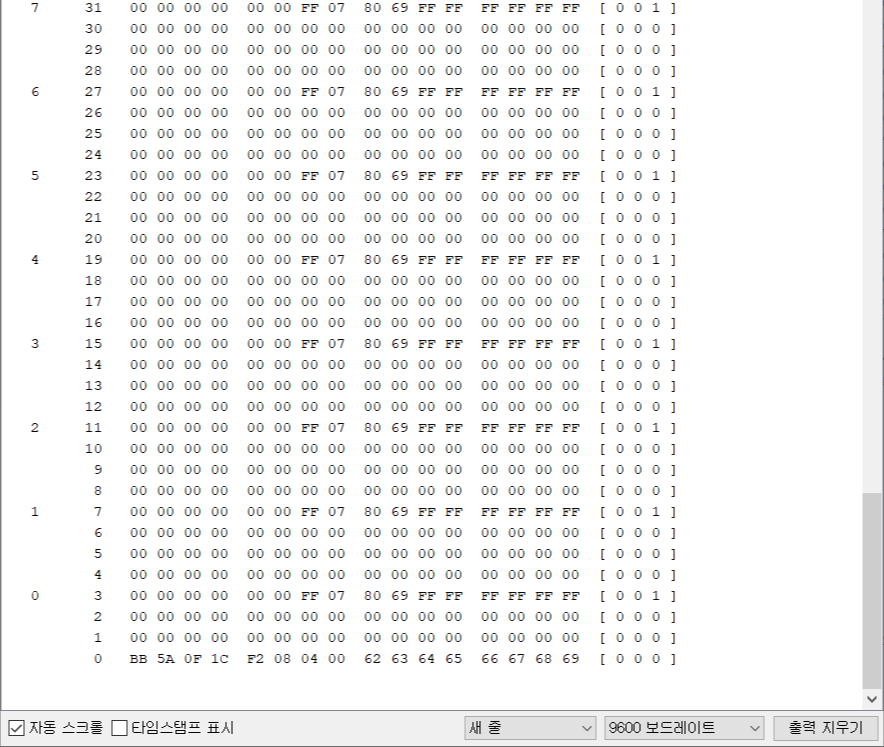
RFID는 ID값을 내부 EEPROM에 기록하는데 기록되어 있는 정보를 Dump해서 볼수가 있다. 예제에서 Dumpinfo를 업로드하고 시리얼 모니터를 실행하면 아래와 같은 결과를 얻을 수 있다.
UID의 내용과 카드 타입 그리고 각 섹터별 정보를 Dump해서 보여준다.

2) 카드접근 및 사용
도어락에 사용하는 카드키와 같이 R
예제는 AccessControl 를 찾아서 불러온다.
프그로그램이 실행되면 마스터 키를 RFID 리더기에 갖다대면 리자모드로 들어갈 수 있다.
관리자 모드에서 사용자의 카드를 한번 인식시키면 등록이 되고 다시 한번 인식시키면 해지가 된다. 사용자 카드를 등록하고 다시 마스터 키를 갖다대면 관리자 모드를 빠져 나온다.
그리고 Normal 모드에서 사용자 키를 인식시키면 등록된 카드는 접근허용된다.

'엔지니어링 > 임베디드' 카테고리의 다른 글
| [아두이노 기초] 타이머 제어 (1) | 2020.02.18 |
|---|---|
| [아두이노 기초] 초음파 센서 (0) | 2020.02.15 |
| [아두이노 기초] 시리얼 통신 (0) | 2020.02.11 |
| [아두이노 기초교육] I2C 통신을 이용한 LCD 제어 (0) | 2020.02.02 |
| [아두이노 기초교육] 7-세그먼트 제어 (0) | 2020.02.01 |


댓글