회로 디버깅 및 표준 통신으로 많이 사용하는 시리얼 통신의 기초 개념에 대해 살펴보고 시리얼 통신을 이용하여 터미널 문자 출력 및 데이터 송수신을 구현해본다.
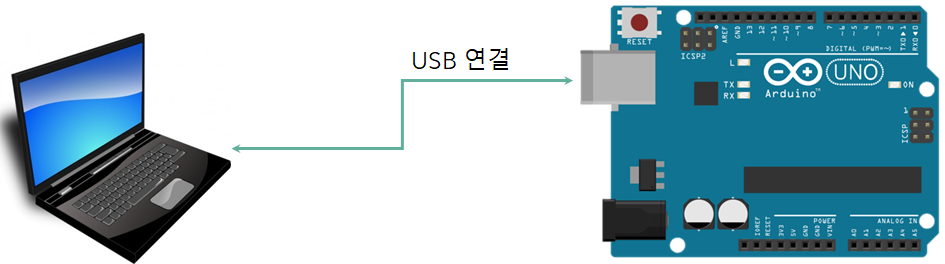
1. 회로도 구성
- 아두이노에는 Serial-to-USB 변환 모듈이 있어 USB를 이용하여 Hardware Serial(Tx, Rx)핀을 노트북과 시리얼로 연결할 수 있다.
2. 기초개념
1) 시리얼(Serial 통신)
- 보통 UART(Universial Asynchronous Receiver and Transmitter)라고 하는 통신방법이다.
- '시리얼'이라는 용어는 데이터를 Serialize/Deserialize 하는 과정을 말한다(2~4개의 통신선으로 데이터 전송이 가능)
- 표준 통신방법이라 세계 표준이며, 간단하게 장비간 데이터를 전송할 수 있다(PC와도 연결가능).
- UART의 종류에는 RS-232, RS-485, RS-422 등 있다.
|
Specification |
RS232C |
RS423 |
RS422 |
RS485 |
|
동작 모드 |
Single-Ended |
Single-Ended |
Differential |
Differential |
| 최대 Driver/ Receiver 수 |
1 Driver 1 Receiver |
1 Driver 10 Receiver |
1 Driver 32 Receivers/256 |
32 Drivers 32 Receivers/256 |
|
최대 통달거리 |
약 15 m |
약 1.2 km |
약 1.2 km |
약 1.2 km |
|
최고 통신속도 |
20 Kb/s |
100 Kb/s |
10 Mb/s |
10 Mb/s |
|
지원 전송방식 |
Full Duplex |
Full Duplex |
Full Duplex |
Half Duplex |
|
최대 출력전압 |
±25V |
±6V |
-0.25V to +6V | -7V to +12V |
|
최대 입력전압 |
±15V |
±12V |
-7V to +7V |
-7V to +12V |
출처: https://www.dsun.kr/90 [Dsuny]

- 시리얼 통신의 구조는 아래와 같다.
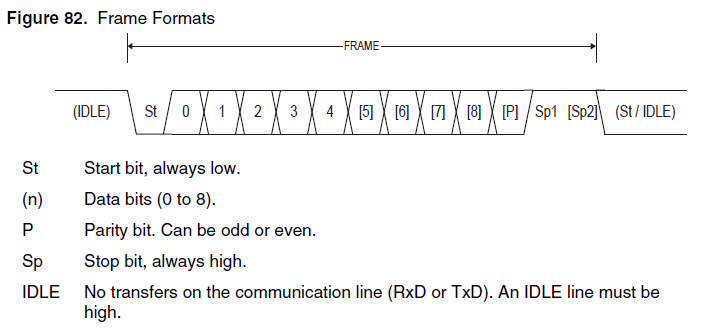
- 시리얼 통신을 사용하기 위한 설정은 아래와 같으며, 보내는 장치와 받는 장치는 반드시 동일하게 설정해야 한다.
예) 9600 8N1
Baudrate : 9600bps
Databit : 8bit
Paritybit : No
Stopbit: 1bit
2) 아두이노의 시리얼 통신
- Hardware Serial: 아두이노에서 물리적으로 시리얼 통신이 가능한 포트를 만들어 놓음, 아래와 같이 간단하게 설정하여 사용함
|
Serial.begin(9600); |

아두이노에서 Hardware Serial은 두 가지 용도로 사용되어짐(동시에 사용할 수 없음)
Programmer : PC에서 컴파일한 아두이노 코드를 실행시키기 위해 USB-to-Serial 변환하여 프로그래밍함
Serial 통신 : 프로그래밍이 끝나고 나면 일반적인 시리얼 통신 용도로 사용이 가능함
- Software Seiral: 디지털 핀을 이용하여 시리얼 통신을 구현할 경우 사용, 아래와 같이 핀을 선언해주어야 함
|
SoftwareSerial mySerial(10, 11); // RX, TX Serial.begin(9600); |
3) 인터럽트
- 프로그램 실행중 현재 처리하는 일을 잠시 중단시키고, 다른 동작을 수행하도록 요구
- 인터럽트는 이벤트라는 신호를 우선 처리하는 방식이며, 정확한 타이밍을 요구할 때 사용(우선순위 높음)한다.
- 인터럽트 신호가 발생하면 인터럽트를 수행하는 함수(Handler또는 Callback)가 로딩되다.
- 인터럽트 수행함수는 동작시간이 짧아야 한다(다음 인터럽트를 받을 수 있기 위해)

- 인터럽트 동작 순서
인터럽트 발생 -> 어떤 인터럽트가 발생했는지 확인(Vector Table) -> 인터럽트 서비스 루틴 실행(인터럽트 함수 실행) -> 종료 후 원래 프로그램을 복귀

- 아두이노에서 인터럽트를 사용하기 위해서는 아래와 같이 인터럽트를 등록해야 함
|
attachInterrupt(digitalPinToInterrupt(pin), ISR, mode) |
디지털 핀 2번 -> Int 0
디지털 핀 3번 -> Int 1
mode 종류
-
LOW to trigger the interrupt whenever the pin is low,
-
CHANGE to trigger the interrupt whenever the pin changes value
-
RISING to trigger when the pin goes from low to high,
-
FALLING for when the pin goes from high to low.
참고자료
https://www.arduino.cc/reference/en/language/functions/external-interrupts/attachinterrupt/
Arduino Reference
Example Code const byte ledPin = 13; const byte interruptPin = 2; volatile byte state = LOW; void setup() { pinMode(ledPin, OUTPUT); pinMode(interruptPin, INPUT_PULLUP); attachInterrupt(digitalPinToInterrupt(interruptPin), blink, CHANGE); } void loop() { d
www.arduino.cc
3. 소스코드
1) 시리얼 출력
- 아두이노 스케치에서 코드 실행(Ctrl + U)후 시리얼 모니터(Ctrl+Sift+M)로 연결한다.
|
/*****************************************************/
|
실행결과
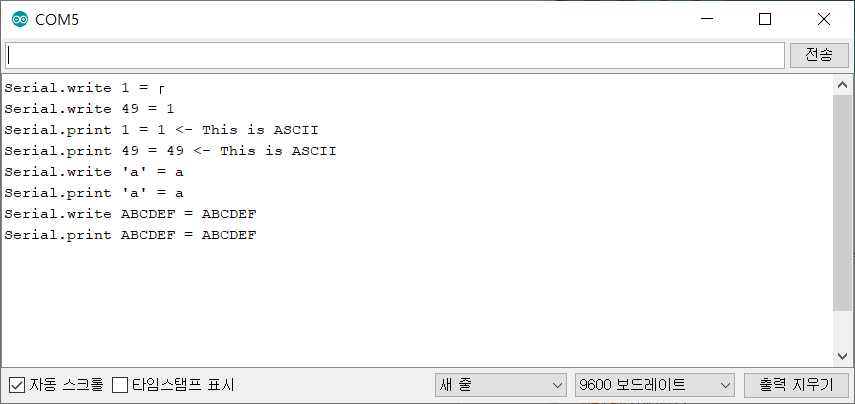
- 시리얼 모니터(또는 터미널)로 출력되는 것은 모두 아스키 코드로 변환된 값이다.
- Serial.print()는 입력값을 아스키(ASCII) 코드값으로 인식하고, Serial.wite()는 데이터 그대로 인식한다.
* 참고(아스키 코드표)


출처 - www.printf.co.kr
2) 시리얼 데이터 송수신(Polling 방법)
- 터미널에서 입력한 데이터를 터미널 창으로 그대로 출력하는 예제
- 폴링 방법은 프로그램이 항상 신호 상태를 확인하도록 되어 있음(resource를 많이 사용함)
| /*****************************************************/ /* Project : Arduino Basic Training Course /* Title : 06_02_Serial_Polling /* Descript : read data from serial tx using Serial Comm with Polling /* Platform : Arduion UNO /* IDE: Arduino Sketch 1.6/1.8 or vMicro /* Author : shlee853 /* History : Rev 1.0 2020.02.11 - Initial release /* /*****************************************************/ char data=0; bool blinkState = false; void setup() { // put your setup code here, to run once: Serial.begin(9600); pinMode(13, OUTPUT); } void loop() { if(Serial.available()){ data = Serial.read(); if(data=='\r') { Serial.write('\r'); Serial.write('\n'); } else { Serial.write(data); } blinkState = !blinkState; digitalWrite(13, blinkState); } } |
3) 시리얼 데이터 송수신(인터럽트 방식)
- 터미널에서 입력한 데이터를 터미널 창으로 그대로 출력하는 예제
- 인터럽트 방법은 리소스 부담이 없고 신호가 입력된 즉시 함수가 실행됨
| /*****************************************************/ /* Project : Arduino Basic Training Course /* Title : 06_02_Serial_Int /* Descript : read data from serial tx using Serial Comm with interrupt /* Platform : Arduion UNO /* IDE: Arduino Sketch 1.6/1.8 or vMicro /* Author : shlee853 /* History : Rev 1.0 2020.02.11 - Initial release /* /*****************************************************/ #define DELAY 1000 char data=0; bool blinkState = false; void setup() { // put your setup code here, to run once: Serial.begin(9600); pinMode(13, OUTPUT); } void loop() { void serialEvent(void) { data = Serial.read(); if(data=='\r') { Serial.write('\r'); Serial.write('\n'); } else { Serial.write(data); } blinkState = !blinkState; digitalWrite(13, blinkState); } |
'엔지니어링 > 임베디드' 카테고리의 다른 글
| [아두이노 기초] 초음파 센서 (0) | 2020.02.15 |
|---|---|
| [아두이노 기초] SPI 통신 (0) | 2020.02.12 |
| [아두이노 기초교육] I2C 통신을 이용한 LCD 제어 (0) | 2020.02.02 |
| [아두이노 기초교육] 7-세그먼트 제어 (0) | 2020.02.01 |
| [아두이노 기초교육] 피에조 스피커 제어 (0) | 2020.02.01 |


댓글