LED를 제어하기 위한 기초 전자회로에 대해 알아보고 Arduino UNO를 이용하여 내장된 LED를 Push button으로 제어해본다.
1. 회로도 구성
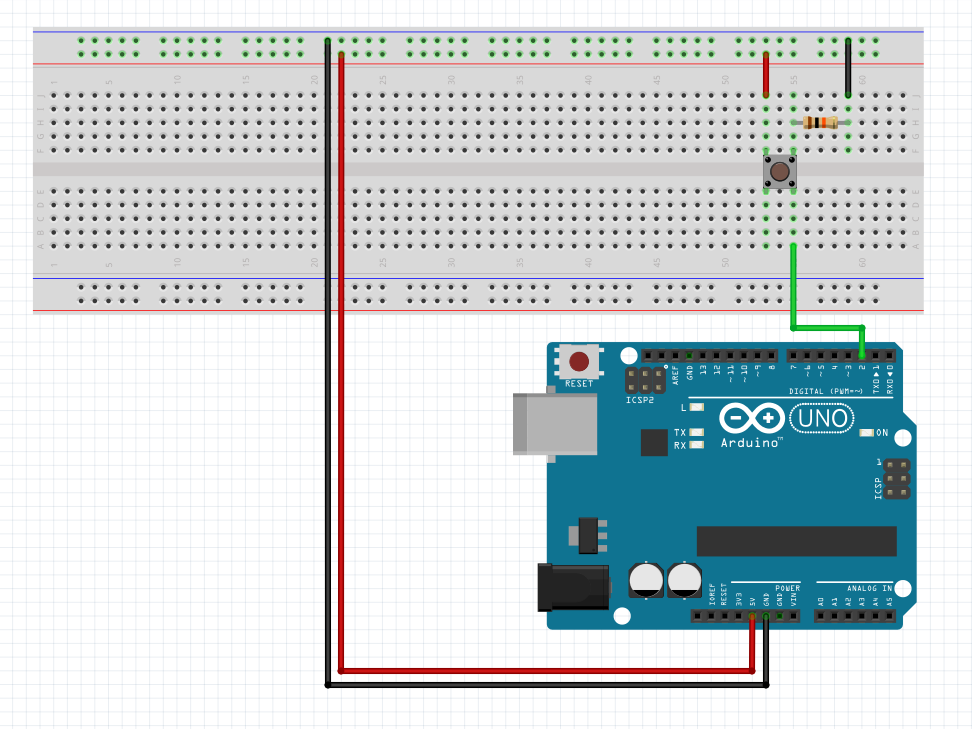
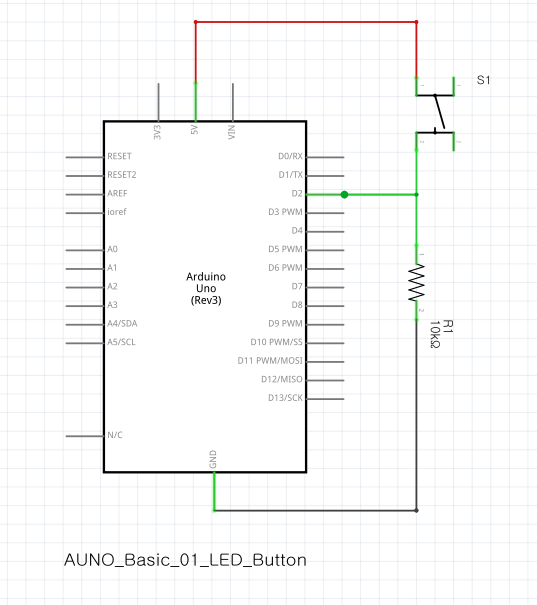
2. 회로설명
1) LED
- 전류를 빛으로 변환해주는 반도체 소자
- 극성있음, 다리가 긴쪽이 + (A), 짧은 쪽은 - (K)
- 약 1.7V, 10mA에서 구동됨
- 5V로 구동시 약 330ohm 저항을 사용함(옴의 법칙 이용하여 저항값 계산)
2) 저항
- 전류의 흐름을 제어
- 손실은 열로 발생함
- 일반저항은 5~10% 의 오차, 정밀저항은 약 1%이하의 오차 있음
- 저항값 읽는 법(https://m.blog.naver.com/ansdbtls4067/220625603453)
3) 푸쉬버튼
- 디지털 신호의 입력포트(High, Low, Floating)
- 디지털 입력 포트의 레벨( TTL, CMOS, LVTTL, LVDS ... )
- 풀업 풀다운 회로 연결법(보통 10k의 저항 사용)
3. 소스코드
AUNO_Basic_01_LED_Button.ino
0.00MB
| /*****************************************************/ /* Project : Arduino Basic Training Course /* Title : 01_LED_Button /* Descript : LED Blink example with Push Button /* Platform : Arduion UNO /* IDE: Arduino Sketch 1.6/1.8 or vMicro /* Author : shlee853 /* History : Rev 1.0 2020.01.31 - Initial release http://www.arduino.cc/en/Tutorial/Button /* /*****************************************************/ const int buttonPin = 2; // the number of the pushbutton pin const int ledPin = 13; // the number of the LED pin // variables will change: int buttonState = 0; // variable for reading the pushbutton status void setup() { // initialize the LED pin as an output: pinMode(ledPin, OUTPUT); // initialize the pushbutton pin as an input: pinMode(buttonPin, INPUT); } void loop() { // read the state of the pushbutton value: buttonState = digitalRead(buttonPin); // check if the pushbutton is pressed. If it is, the buttonState is HIGH: if (buttonState == HIGH) { // turn LED on: digitalWrite(ledPin, HIGH); } else { // turn LED off: digitalWrite(ledPin, LOW); } } |
'엔지니어링 > 임베디드' 카테고리의 다른 글
| [아두이노 기초교육] 피에조 스피커 제어 (0) | 2020.02.01 |
|---|---|
| [아두이노 기초교육] RGB LED 제어 (0) | 2020.02.01 |
| [아두이노 기초교육] 아두이노 소개 (0) | 2020.01.15 |
| 리눅스 Ubuntu 명령어 정리 (0) | 2019.11.15 |
| 리눅스에 Boost 라이브러리 설치 (0) | 2019.11.15 |


댓글